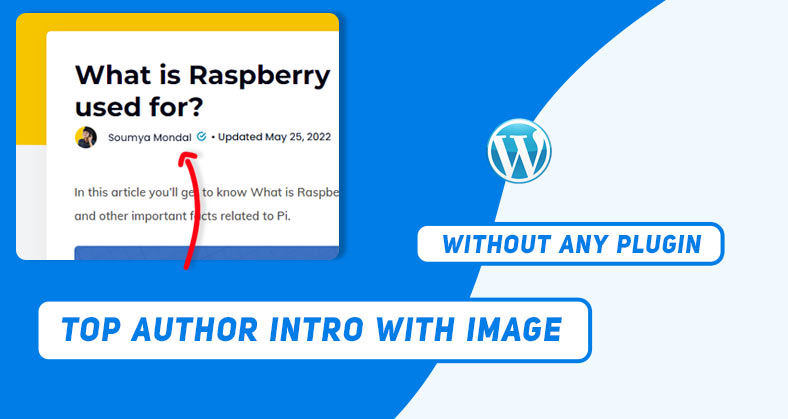
This tutorial on ‘Add Author image with author name in WordPress without plugins’ is one of the most awaited and requested tutorials on our website. After completion of the steps, you’ll have an author image at beginning of WordPress blog posts along with the author’s name.
The theme I’m using in this WordPress website is Generatepress. If you’re using any theme like Generatepress or Astra that lets you customize Elements & hooks on your own, then you’re good to go.
If that’s not the case, you may need to modify the functions.php file, or for a safe & smooth process, install plugins to insert PHP snippets.
Let us now start building the custom Author section.
Creating Hook
To create a custom Hook, navigate to WordPress Dashboard > Appearance > Elements.
Click on 'Add new element' on the top, and choose element type as 'Hook'.
Name your hook as ‘Top author section’ or anything similar so that it helps you navigate among all your custom hooks.
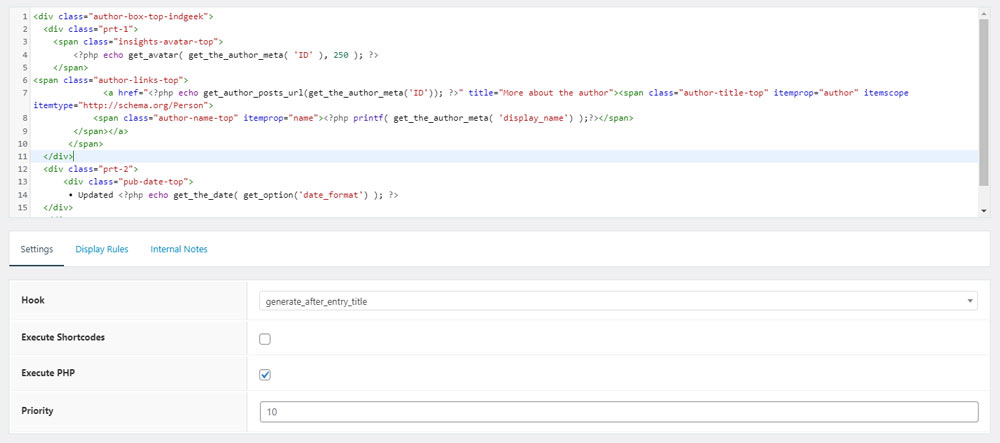
Paste the following code snippet inside the box.
<div class="author-box-top-indgeek">
	<div class="prt-1">
    <span class="insights-avatar-top">
        <?php echo get_avatar( get_the_author_meta( 'ID' ), 250 ); ?>
    </span>
<span class="author-links-top">
							<a href="<?php echo get_author_posts_url(get_the_author_meta('ID')); ?>" title="More about the author"><span class="author-title-top" itemprop="author" itemscope itemtype="http://schema.org/Person">
            <span class="author-name-top" itemprop="name"><?php printf( get_the_author_meta( 'display_name') );?></span>
        </span></a>
       </span>
	</div>
	<div class="prt-2">
			<div class="pub-date-top">
			 • Updated <?php echo get_the_date( get_option('date_format') ); ?>
	</div>
	</div>
</div>
Besides pasting the code, some settings are needed to be tweaked as well.
Choose the Hook position as ‘Generate_after_entry_title’, so the author section shows immediately after the Entry Title of blog posts.
Check the Execute PHP option and set a higher priority number if you have multiple hooks set up.
In the 'Display Rules' tab, choose Location as ‘Posts’ & ‘All posts‘.
Functions in Hook
Let us discuss the key functions used in this code snippet to give you an idea of the following code.
The get_avatar() function grabs the author image of respective posts.
Next, the get_author_posts_url() function fetches the authors profile link.
get_the_date() function grabs the article publishing date.
All the functions discussed are WordPress based functions and receive different arguments based on functionality.
After all the tweaking, click on publish so that the hook is deployed.
The process of adding an author image with the author name in WordPress still needs some styling.
Styling Author image
After the custom element was deployed, Cascading Style Sheets are yet to be added for finalizing the author image section.
In the thumbnail there is a Verified icon after the author’s name, we’ve covered that topic in another tutorial.
Also Read: How to add a verified icon to WordPress Authors
To add CSS, again navigate to your WordPress Dashboard > Appearance > Customize.
In the customize section, open up the ‘Additional CSS’ option at the bottom of the navigation menu bar.
Paste the following CSS code that’ll apply to the elements of the hook we previously created.
.author-box-top .insights-avatar-top img{
	width: 30px;
	height: auto;
	border-radius: 50%;
	margin-right: 12px;
}
.author-box-top{
	font-size:14px;
	font-family: poppins, mont, montserrat, verdana, helvetica, roboto, sans-serif;
}
.author-box-top{
	display:flex;
	flex-direction:row;
	padding-top:8px;
}

.pub-date-top{
		font-size:14px;
		margin-right: 15px;
		color:#060e2b;
}
.entry-meta{
	display:none;
}


.author-name{
	display:none;
}
.author-name-top{
	color:#0a1332;
}
.author-name-top:after {
    content: url(https://indgeek.com/wp-content/uploads/2022/02/best-verified-icon.svg);
		zoom:55%;
		margin: 0 12px;
}
@media screen and (max-width:530px){
	.author-box-top{
		display:flex;
		flex-direction:column;
	}
	.prt-1{
		display:flex;
		flex-direction:row;
	}
}

@media screen and (min-width:530px){
	.author-name-top{
		position: relative;
	top:-10px;
	}
}
After appending the CSS code to your customize section, click on Publish at the top of the page.
All set and you’re good to go. Now your website has it’s own author image section along with author name.
Conclusion
This was yet another tutorial in our ‘WordPress No plugin‘ series where we add functionalitis without using any WordPress plugins.
I hope this article on ‘Author image with author name in WordPress without plugins’ was helpful to you. If you faced any difficulties, don’t forget to comment down below.