Images contain most of the weight of a Webpage, Thus they need to be perfectly optimized in order to achieve fast loading speed. Several steps help us optimize images for wordpress that we will be discussing shortly.
According to researches, a 100-millisecond delay in page load speed can decrease conversion up to 7%, While fast loading page gets more lead in conversion as well as becomes more beneficial for SEO.
Let us go through the list of ways how to optimize images for WordPress.
Why do we need to Optimize Images?
No matter what CMS you are using, you need to Optimize images that you’re using in your website in term of SEO as well as other factors which helps to decide if it will help you rank on search results or not. Let’s explore the facts that help optimize images for WordPress.
Also Read: Best Keyword Research tools for free
1. Using External Compressing

Choose Images relevant to the content you’re on to. Infographics as well as visualizations deliver informative quotes to users. Make sure you have used a well amount of Images in the Article.
After you’ve edited and exported any Image, It can be compressed further without losing the quality of the image. The image itself will lose its size or weight retaining its maximum quality.
CompressJPEG & CompressPNG are two of the tools that you can use to Compress images respectively for Jpeg and Png Images.
2. Exporting photos for web Legacy
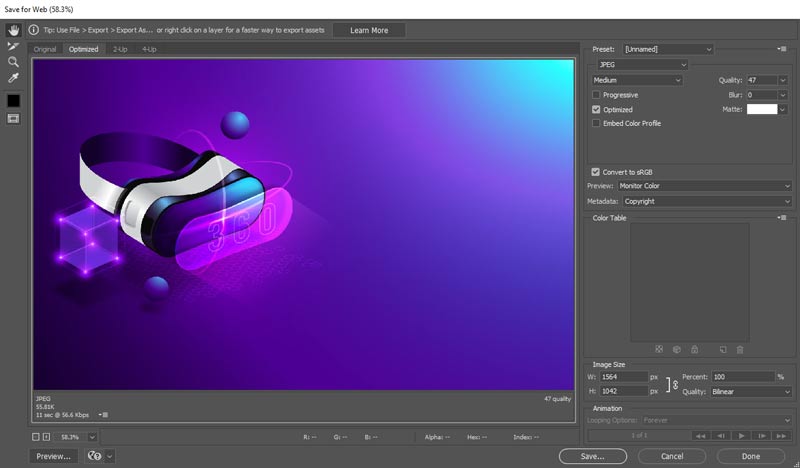
Rather than using online tools like Canva or Glorify, Most bloggers or web Designers prefer using Photoshop for further customizability.
Photoshop lets users do basic image customization like resizing, resolution management, and as well as a Higher level of tasks like Background removal, Cover creation, etc. Depending on the purpose we export pictures in Jpg or Png format though You need to know there is a specific setting in Photoshop to export files for web use.
The export setting is known as “Save for web Legacy“, You can find that from ‘File>Export’ or use ‘Ctrl+Alt+Shift+S‘ for windows.
From the web legacy settings, users can export the image in a specific size, Formats like PNG, JPG, WBMP, GIF, etc. A lot of customization can be acquired in the exporting settings that might come in handy for your Blog related Photoshop experience.
3. Using CDN

While fast Hosting Plays a lead role in Image Loading speed and optimization, Using a CDN can be really useful. Personally, we suggest going for a LiteSpeed server over Apache as it approaches with Litespeed technology and integrates with Cloudflare free CDN without any hassle.
Talking of Litespeed Server-based Hosting, Hostinger is really affordable hosting, especially for beginners. Coming to CDN, Cloudflare is one of the best alternatives to paid CDN services out there.
4. Properly size Images

Images used in an Article can define page speed and also Informative index of it. If the image is less than recommended size, it will blur out in pixels, otherwise if kept bigger, it will affect Page load time.
To find out the optimal size of an image to be used in a blog post, You need to know the width of your post first. Simply press ‘Ctrl+Shift+I‘ then navigate to the Style tab to get to know about post width. Note that you need to keep maintaining the image width almost the same as the Post width to get the most out of it.
To optimize Images for WordPress posts, resizing is one of the convenient ways to do so. In case you’ve forgotten to Optimize images for WordPress posts, you can always do it even in WordPress Media Editor.
5. Add Alt tags

If you just ignore adding the ‘Alt’ tag in your images that you upload and use in Blog posts, then you probably be missing out on some of the Great SEO opportunities.
An alternative text, also known as alt text or alt tag, is the term that becomes visible when an image is unable to load on your site. Luckily your visitor gets an idea of the unloaded image with the help of the Alt tag.
It can be a myth but in some cases, Alt tags can be considered as a major factor to rank images on Search Engines. So never forget to include them.
We grew our traffic by 3000%
Let's see how!
Join 5,000+ others who get our weekly newsletter with
insider WordPress tips! Best of Luck!
6. Caption and Rename images
Adding captions manually to each photo can be overwhelming to you, Still, it has several benefits in SEO and Content infographical assessments.
While captions can be informative for users to understand the relevancy of Content, Titles, on the other hand, plays a role in determining SEO on basis of Search terms.
If you consider adding a caption to images is a time-consuming job, many plugins are out there to put automation on, in caption extraction from the Title of Image. While Captions and Naming don’t impact much on SEO, still that’s one of the methods of how you can Optimize Images for WordPress Blog.
7. Using Plugins

If you’ve been through WordPress for some time, you might be able to recall some of the Popular Image Compression plugins:
1. Smush
2. Optimole
3. Shortpixel
4. Imagify
5. EWWW Image Optimizer
In some of the plugins, there’s an option to enable Lazy loading images. What it does, images load only when a visitor scrolls down near it. Lazy load is really helpful when a post contains multiple pictures, it handles your page loading time quite efficiently.
Except for lazy Loading, the plugins mentioned above compress Images to a certain limit based on their performance.
Conclusion | Optimize Images for WordPress:
Hopefully, the article was informative enough to deliver Answers to your queries about How to Optimize Images for WordPress Blog Posts.
You need to make those factors daily habit while writing any Article to properly Optimize Images for WordPress and get the most benefit out of Blogging.
I hope you liked the Article, See you soon.